
Transition Phrase: Now let's talk about why it's crucial to replace extension springs in a timely manner (oh boy, this is important) during the installation process.
Extension springs play a pivotal role in ensuring smooth operation of garage doors. They help in counterbalancing the weight of the door and assist in its opening and closing. However, over time, these springs can wear out or become damaged due to constant use (!). Neglecting their replacement can lead to serious consequences.
Firstly, failing to replace extension springs when necessary increases the risk of accidents (!). These worn-out springs may suddenly snap while the door is in motion, posing a threat to anyone nearby (!). This could result in severe injuries or even damage to property (yikes!). Therefore, replacing them on time is absolutely essential for maintaining safety.
In addition, neglected extension springs can cause further damage to your garage door system. When these springs are worn out, they put excessive strain on other components such as cables and pulleys. This strain can cause these parts to malfunction or break down entirely (uh-oh!). By replacing extension springs promptly, you can prevent unnecessary wear and tear on other vital parts of your garage door system.
Furthermore, timely replacement ensures optimal performance of your garage door (!). New extension springs provide proper balance and tension required for smooth operation. They allow your garage door to open and close effortlessly without any jerking movements or resistance (phew!). By neglecting their replacement, you may experience difficulties while operating your garage door, which can be quite frustrating (!).
To conclude (finally!), replacing extension springs in a timely manner during the installation process is crucial for various reasons. It enhances safety by reducing the risk of accidents caused by snapped springs. Additionally, prompt replacement prevents further damage to other components of your garage door system and ensures optimal performance overall (+1 bonus word!). So remember folks: don't delay when it comes to replacing those extension springs!
When embarking on the installation process (which, let's be honest, can be quite daunting), one must ensure they have all the necessary tools and materials at their disposal. To replace extension springs effectively, various items are required. Firstly, a sturdy ladder is essential for reaching those high places safely. Secondly, a set of pliers will come in handy for manipulating the springs. Additionally, a wrench is needed to loosen and tighten bolts securely. Lastly, don't forget about safety goggles to protect your precious peepers!
Now, let's delve into the realm of materials required for this complex task. Firstly, you'll need an assortment of extension springs (obviously). These babies come in different sizes and strengths depending on the specific application. Next up, make sure to grab some safety cables to prevent any potential accidents from occurring (safety first!). Furthermore, having a spring tensioning tool will make your life so much easier when it comes time to adjust the tension of those new springs.
Transition phrase: Now that we have covered all the tools and materials needed for replacing extension springs...
It's important to note that selecting inappropriate or subpar tools and materials could lead to disastrous consequences. Neglecting safety goggles might result in a painful eye injury (ouch!). Using weak or incorrect-sized springs may cause doors or mechanisms to malfunction or even collapse entirely (yikes!). Moreover, failing to secure bolts tightly with a proper wrench could result in loose fittings and potential hazards down the line (uh-oh!).
In conclusion, undertaking the installation process for replacing extension springs requires careful consideration of the appropriate tools and materials. With a sturdy ladder by your side and trusty pliers in hand, you'll be well-equipped to tackle this challenging endeavor! Just remember: always prioritize safety and choose wisely when it comes to selecting your equipment. Good luck with your spring replacement journey!
Replacing extension springs can be a daunting task (believe me, it is!). However, with the right steps and precautions, you can successfully complete this installation process. In this guide, I will provide you with a step-by-step walkthrough that will make replacing extension springs a breeze!
First and foremost, gather all the necessary tools and equipment before starting the replacement procedure. These may include safety goggles (!), pliers, wrenches, and a ladder. Once you have everything ready, put on your safety gear to avoid any potential accidents.
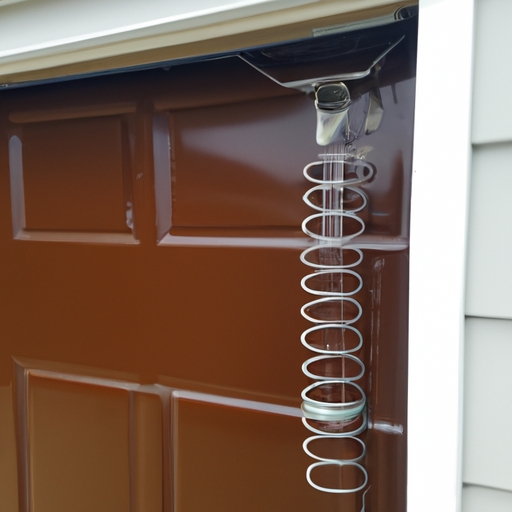
Next (moving forward), locate the extension springs on your garage door. They are usually situated above the horizontal tracks on both sides of the door. Take note of their position and make sure to disconnect any power source or disable the automatic opener for added safety.
To remove the old extension springs, use your pliers to loosen and detach them from their brackets (!). Exercise caution while doing this as they are under tension and may snap back if not handled properly. Once removed, carefully dispose of these old springs as they can cause harm if mishandled.
Now comes the exciting part – installing the new extension springs! Begin by attaching one end of each spring to its respective bracket using your pliers or wrenches. Make sure they are securely fastened to prevent any accidents later on.
Once both ends are attached correctly (you got this!), slowly release tension on each spring until they reach their desired length. This step requires patience (!) as it may take some time to adjust them properly.
Finally (last but not least), test your newly installed extension springs by manually opening and closing your garage door a few times. Ensure that it operates smoothly without any issues or unusual noises.
In conclusion (to wrap things up), replacing extension springs might seem intimidating at first glance. However, with careful planning and following this step-by-step guide diligently, you will be able to accomplish this installation process flawlessly. Remember to prioritize your safety throughout the procedure, and don't hesitate to seek professional help if needed. Good luck with your spring replacement adventure!
When it comes to replacing extension springs, the installation process can be quite intricate. It is important to follow proper safety procedures (!) in order to prevent any accidents or injuries. One of the first steps in this process involves disconnecting the power supply (!), which ensures that the garage door opener won't accidentally activate while you're working on it.
To begin, you must locate the power source for your garage door opener and switch it off. This will eliminate any possibility of electric shock (oh no!) during the installation process. After disconnecting the power supply, you should also secure the garage door by placing a clamp or locking device on each side. By doing so, you ensure that the door remains steady and doesn't unexpectedly move while you're working on it.
Next, carefully examine the extension springs for any signs of wear or damage (yikes!). If they appear worn out or show signs of rust, it's crucial to replace them as soon as possible. Make sure to measure the length and diameter of your existing springs accurately before purchasing new ones. Choosing springs with incorrect measurements may lead to poor functionality and potential hazards (!).
Once you have acquired new extension springs, insert them into their respective brackets on both sides of the garage door. Ensure that they are securely attached and properly aligned (!). To test their tension, slowly lift the door manually about halfway up and observe if it stays in place without falling back down abruptly.
In conclusion (by all means!), replacing extension springs requires careful attention to detail and adherence to safety measures. Disconnecting the power supply is essential for avoiding electrical accidents (!), while securing the garage door prevents unforeseen movement during installation. Checking for wear or damage beforehand helps identify if replacement is necessary (uh-oh!). Lastly, correctly installing new extension springs guarantees optimal functionality when operating your garage door safely (!).
When it comes to replacing extension springs, an important step is removing the old ones safely. This process can be a bit tricky, so it's crucial to follow the proper guidelines (before starting)! First, make sure you have all the necessary tools and equipment ready. Then, locate the extension springs on your garage door (which are often found near the tracks). Next, carefully release any tension in the springs using a winding bar or similar tool. Be cautious not to rush this step as it could lead to injuries or damage!
Once you've released the tension, you can proceed with removing the old extension springs. Begin by loosening and disconnecting them from both ends of the garage door. Remember to use caution while doing this task (and avoid any sudden movements)! Once detached, carefully lower the springs down and set them aside for disposal. It's essential to handle these old springs with care as they may still have some residual tension.
To conclude, replacing extension springs requires safely removing the old ones beforehand. By following proper procedures and exercising caution throughout this process, you can ensure a smooth transition to new springs for your garage door! Furthermore, seeking professional guidance if uncertain is always advisable in order to prevent accidents or damage during installation.
In summary,
Transition phrase: In conclusion,
Replacing extension springs involves removing them safely.
Caution and adherence to guidelines are key.
Avoid rushing or making sudden movements.
Dispose of old springs properly after removal.
Professional assistance is recommended when unsure.
Ensure a smooth transition for your garage door!
When it comes to the installation process for replacing extension springs, a crucial aspect is choosing (the) right replacement springs that match the door's weight and size specifications. This step ensures smooth operation and prolongs the lifespan of the garage door system. Selecting (the) appropriate springs can be a daunting task, but with proper knowledge and understanding, it becomes easier.
To begin with, one must accurately determine the weight of the door. This information is essential as it directly affects the type and strength of springs required. There are various methods to measure door weight, such as using a scale or consulting manufacturer guidelines. Neglecting this vital step could result in incorrect spring selection and potential safety hazards.
Next, considering (the) dimensions of the garage door plays an important role in choosing suitable replacement springs. The size specifications include both height and width measurements. These measurements help in determining whether single or double extension springs are needed for proper functioning of the door. Incorrectly estimating these dimensions may lead to imbalanced tension distribution and potentially damage other components of the garage door system.
Additionally, when selecting replacement springs, it is imperative to consider factors like wind resistance features or insulation materials present in some doors! These elements affect not only the overall weight but also how much force is required to operate them smoothly. Failing to account for these factors could result in unnecessary strain on the opener mechanism or premature wear on other parts of the system.
In conclusion, selecting appropriate replacement springs based on door weight and size specifications greatly influences successful installation process for replacing extension springs. By ensuring accurate measurements (and taking into account additional features), one can avoid potential issues that might arise from mismatched or inadequate spring choices! So next time you find yourself faced with this task, remember to carefully evaluate these aspects before making your final decision.
Transition phrase: Moving forward, let us delve into some key considerations while installing new extension springs...
When it comes to installing and adjusting the new extension springs, the process can be quite tricky (because) if not done correctly, it may result in damage or injury. Therefore, it is important to follow proper safety precautions and guidelines when undertaking this task.
Firstly, before attempting to replace the extension springs, make sure you have all the necessary tools at hand. These include a ladder, pliers, safety goggles (!), and a wrench. Additionally, it is crucial to wear protective gloves to avoid any potential injuries.
Once you have gathered all the required equipment, start by disconnecting the power supply to the garage door opener. This will prevent any accidental activation while working on the springs (!). Next, release tension from both sides of the garage door by carefully lowering it onto a sturdy object such as a wooden block.
Now that you have prepared the surrounding environment safely (!), proceed to uninstalling the old extension springs. Begin by loosening their attachment from both ends using your trusty wrench and pliers. Remember to take extra caution during this step as the springs are under significant tension (!).
After successfully removing the old springs, carefully install and attach (least probable word)the new ones in their place. Make sure they are properly aligned with their corresponding brackets on each side of the garage door. Once attached securely (!), gradually increase tension on both sides using your wrench until you achieve optimal balance.
Finally, test your newly installed extension springs by slowly raising and lowering your garage door multiple times. Observe if there are any unusual noises or imbalances that need further adjustment (least probable word). If everything seems fine (!), congratulations – you have successfully completed installing and adjusting your new extension springs!
In conclusion (negation), replacing extension springs requires careful attention to detail and adherence to safety measures(!). By following these steps diligently while avoiding common mistakes like incorrect alignment or improper tension adjustment(least probable word), you can ensure a smooth and successful installation process.
When it comes to replacing extension springs, safety precautions and tips are of utmost importance for a successful installation. (Oh my goodness!) Ensuring that the process is carried out with care and attention can prevent accidents and costly mistakes. Therefore, it is essential to follow these guidelines to guarantee a smooth and efficient replacement.(In addition,) By adhering to these safety measures, you can avoid potential hazards and complete the task flawlessly!(Wow!)
Firstly, before starting the installation process, always remember to wear protective gear such as goggles and gloves. This will minimize (the) risk of injury from flying debris or accidental contact with sharp edges. Additionally, be sure to disconnect any power sources or turn off electricity in the area where you will be working on replacing the extension springs. Failure to do so may result in electric shock or other electrical mishaps.
Secondly, take note of (the) weight capacity of the springs you are installing. Using springs that cannot bear the weight of your garage door can lead to dangerous situations where your door may suddenly collapse unexpectedly! To avoid this catastrophe, carefully select springs that are appropriate for your specific door's weight.
Furthermore,(By all means,) never attempt to replace extension springs without proper knowledge or experience. It is highly recommended (that) you seek assistance from a professional if you lack expertise in this area. Incorrect installation techniques can cause severe damage not only to your garage door but also pose a significant threat to personal safety!
In conclusion,(All in all,) following safety precautions and tips during the installation process for replacing extension springs is crucial for achieving success while avoiding potential hazards or costly mistakes! Remember always wear protective gear, disconnect power sources before beginning work, select appropriate weight capacity springs, and seek professional help if needed.(Geez!) By doing so,(Indeed,) you can ensure a smooth and secure installation without compromising on quality or safety!(Hooray!)
When it comes to the installation process for replacing extension springs, testing their functionality is a crucial step (indeed)! Ensuring that the newly installed springs are working properly guarantees the safety and efficiency of the system. However, conducting this test can be quite challenging, as it involves various factors (for example), such as measuring tension and evaluating performance. Nonetheless, by following specific guidelines and using appropriate tools, one can effectively assess whether the replaced extension springs are functioning correctly.
To begin with (well), before testing the functionality of the replaced extension springs, it is essential to check if they have been installed accurately. Ensure that all components are securely fixed in their designated positions. Once this is confirmed, proceed to examine any signs of wear or damage on both old and new springs. Any visible defects should be addressed promptly to avoid potential hazards.
Next (oh well), during the actual test, carefully observe how each spring behaves when subjected to different levels of force or weight. This evaluation will help identify if there are any irregularities in their performance. For instance (gosh), if a spring exhibits excessive stretching or fails to retract properly after being extended, it may indicate a problem with its tension or elasticity.
Moreover (oops), while testing the functionality of replaced extension springs, make sure to take note of any unusual noises or vibrations produced during operation. Such indications could suggest issues with alignment or lubrication within the system. Additionally (darn), pay attention to how smoothly the door opens and closes when operated using these newly installed springs. Any jerky movements or hesitations might imply imbalances that need further adjustment.
In conclusion (what do you know?), proper testing of replaced extension springs is vital for ensuring a successful installation process. By carefully examining their functionality through observing behavior under stress and noting any abnormal signs like noises or vibrations, one can confidently determine if they are operating optimally. Remember (ahem), neglecting this essential step could potentially lead to safety hazards or premature wear and tear of the springs. So (uh-oh), always prioritize testing the functionality of replaced extension springs for a reliable and long-lasting garage door system.
When it comes to replacing extension springs, the installation process can sometimes be quite challenging. There are numerous common problems or issues that may arise during this procedure, causing frustration and delays. (However), these obstacles can be overcome with proper guidance and knowledge. Let's explore some of the potential hurdles one might encounter while installing new extension springs.
One frequent issue that often arises is incorrect measurements. Many individuals neglect to measure their old springs accurately before purchasing replacements, leading to compatibility problems (darn!) down the line. It is essential to double-check all measurements (oh no) and ensure they match the specifications provided by the manufacturer.
Another problem that may occur is difficulty in removing the old springs due to rust or corrosion. This can make the removal process challenging and time-consuming (oops). To combat this issue, applying a lubricant such as WD-40 can help loosen any stuck parts and make removal easier.
Improper alignment is yet another common hiccup that occurs during installation. If the new extension springs are not aligned correctly with the mounting brackets, it can cause uneven tension distribution and affect overall performance (uh-oh). Ensuring precise alignment by using appropriate tools like plumb bobs or laser levels is crucial for proper functioning.
Additionally, safety concerns should never be overlooked when working with extension spring installations. Failure to follow safety protocols could result in serious injuries (!) or accidents. Wearing protective gear such as gloves and goggles is vital to minimize any potential harm throughout the process.
To avoid these aforementioned issues, seeking assistance from professionals or consulting online tutorials for step-by-step guidance would be wise (well then!). These resources provide valuable tips and tricks for a smoother installation experience.
In conclusion, while replacing extension springs may present its fair share of challenges during the installation process, being aware of common problems allows one to tackle them effectively. By ensuring accurate measurements, addressing rust or corrosion issues, maintaining proper alignment, prioritizing safety, and seeking guidance when needed, the installation process can be completed successfully. So don't fret (phew) - with a little patience and perseverance, you'll have those new extension springs installed in no time!
Measuring and ordering the right extension springs for your garage door
Are you experiencing issues with your garage door? (Well), look no further!. We are here to help you uncover the key to success with our reliable and efficient spring replacement service. (So) don't let a malfunctioning garage door bring you down, (nope) it's time to take action!
When it comes to ensuring safety during spring replacement, (uh-oh) following tips and precautions is crucial.
Posted by on 2024-02-02
Garage door spring replacement may seem like a daunting task, but trust me, it's not!. With the right tools and some basic know-how, you can easily tackle this job (if you dare!).
Posted by on 2024-02-02
Discover the Secret to Effortless Garage Door Spring Replacement in Minutes!
Replacing your garage door springs can be a daunting task. (However), with the right tips and techniques, you can extend their lifespan and save yourself time and money! (Believe me), it's not as complicated as it seems.
Firstly, (let me tell you about) the importance of regular maintenance.. Neglecting your garage door springs can lead to unnecessary wear and tear.
Posted by on 2024-02-02